HOW TO: Add More Details to an Invoice by Using the Advanced Form

© Jemastock /Adobe Stock
When invoicing, we believe simplest is best, but we know that sometimes certain invoices require more information to better bill your client.
That's why we have implemented a Basic Form and Advanced Form to our billing templates, whether you’re invoicing, providing a quote, or issuing a receipt with Invoice Home.
There’s a lot of things that go into making an invoice, from contact information of the billed party, to taxes and organizational details. If you’re contemplating what information should be included, click here to learn more about how to fill out your invoice.
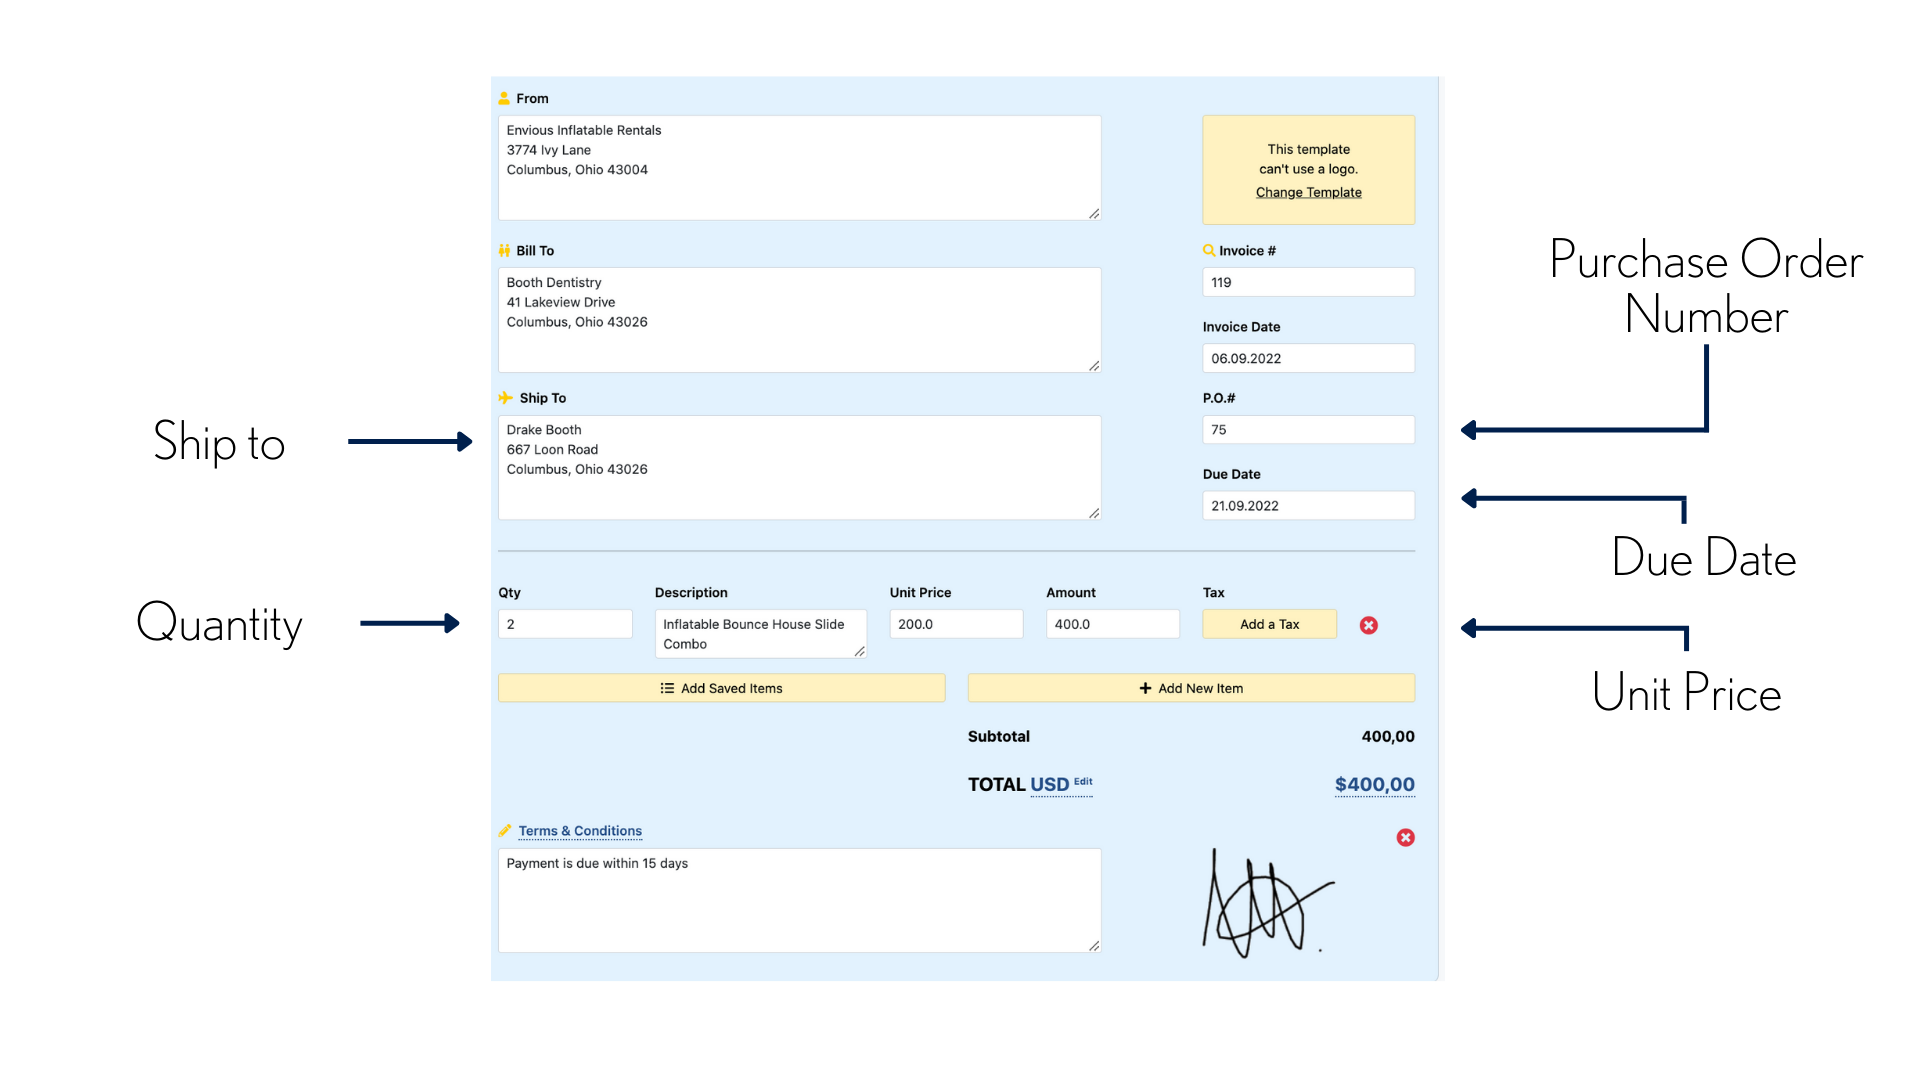
The Advanced Form allows you to provide more context, both for your client and for your own organization and filing. There's several details on the Advanced Form that are not featured on the Basic Form, such as the:
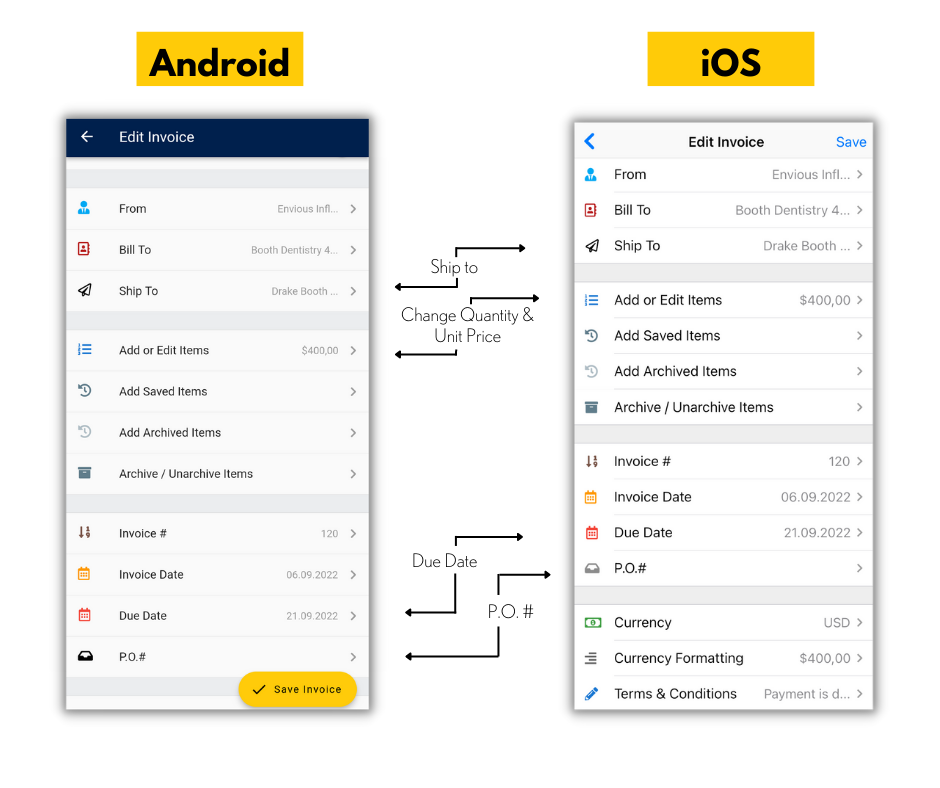
- “Ship To” address box which is for when you are shipping to a different address than the one you are billing to.
- Due date that lets you assign a date for when you expect to receive payment.
- Purchase order number that is used to match a purchase order document to an invoice.
- Quantity which allows you to reflect how many times one item was purchased.
- Unit Price which shows the price of one item, if the item is purchased more than once.
If you would like to feature any of these details, use our Advanced Form. Here’s how to get started in 6 simple steps:
How to use the Advanced Form
Click Here for Mobile Instructions
DESKTOP
1. Sign in to Invoice Home here.
2. Create a new document or open a previous one.

3. Click "Edit."

4. Select “Advanced Form.”
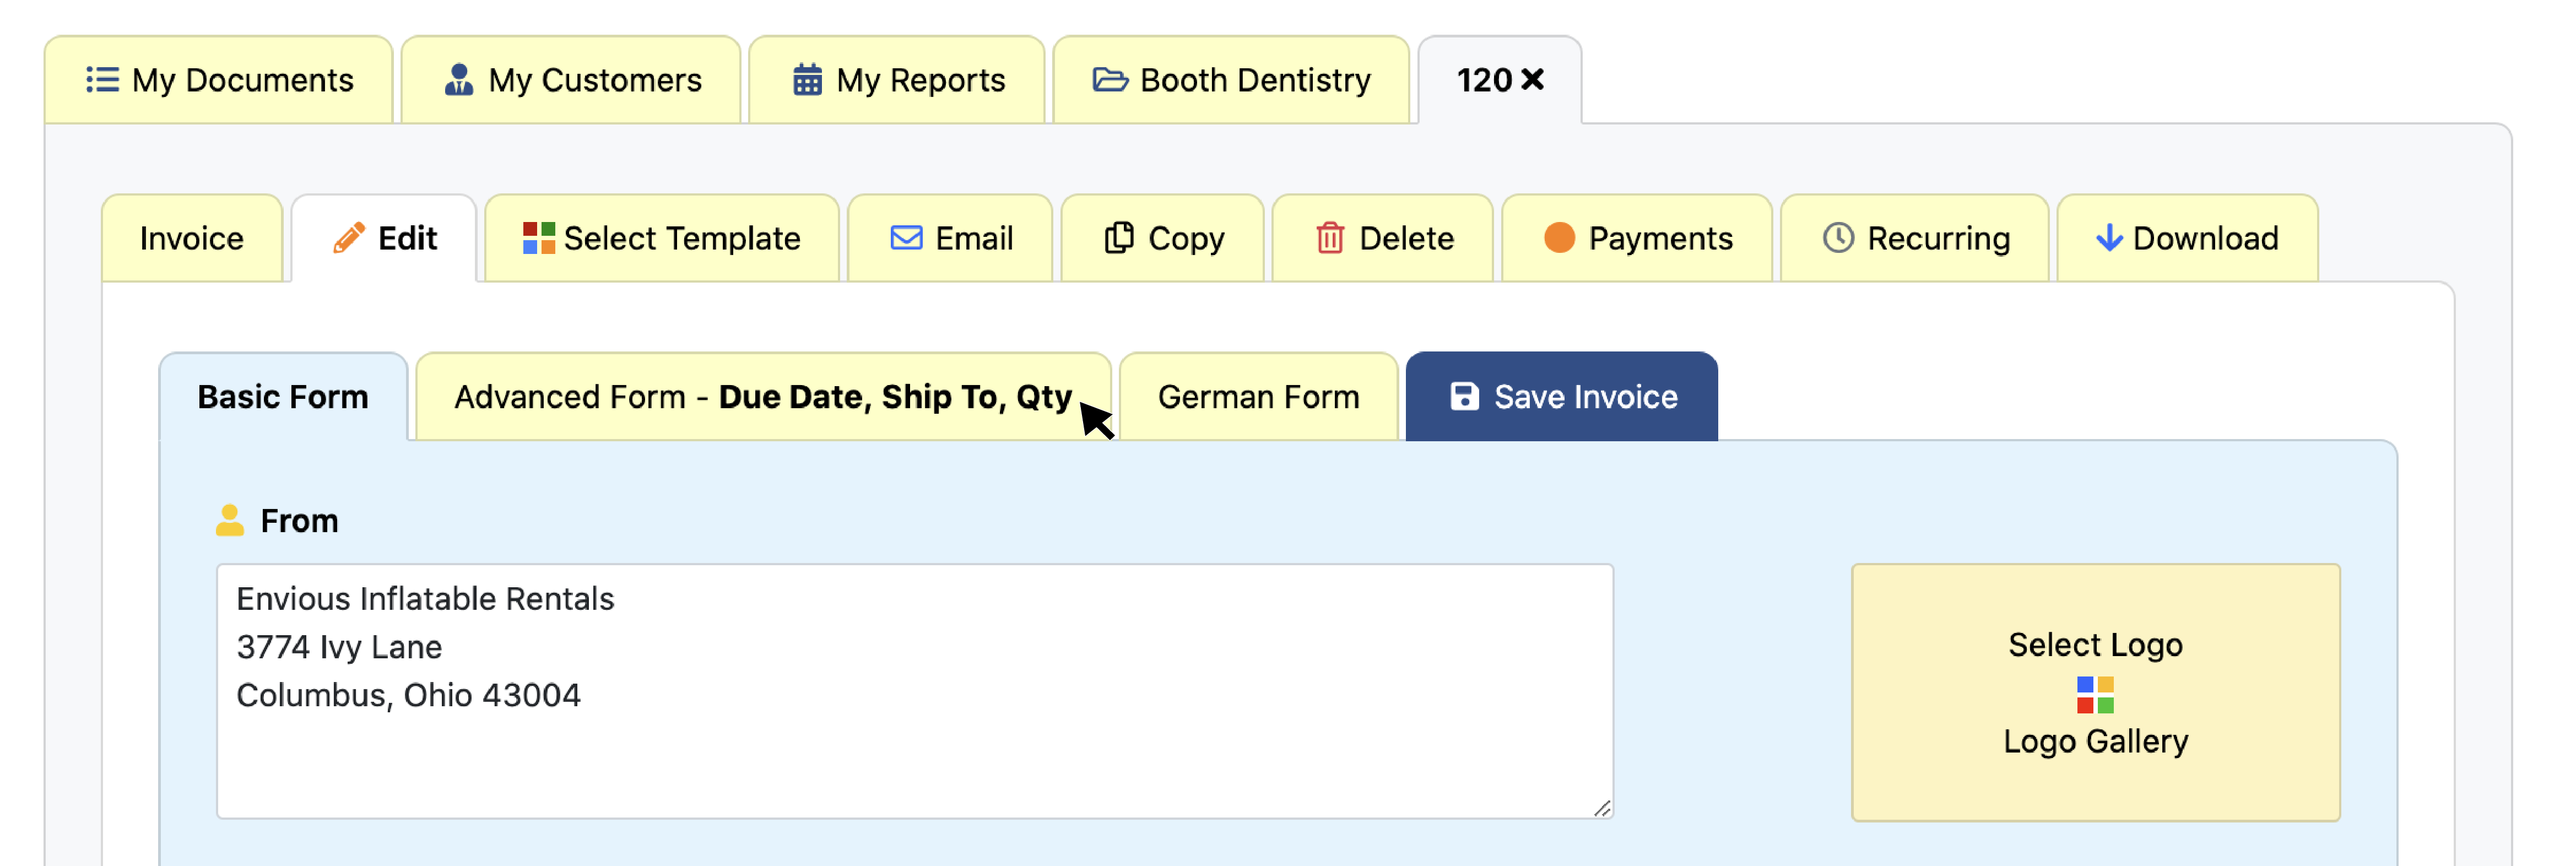
5. Enter in the information that you would like to see on the invoice.
6. Click “Save Invoice.”

That's it! You know how to and why to use our advanced form when creating a billing template. Click here to start editing your own invoice using the advanced form.
Pro tip: After you have entered all of your invoice details, you can save time on your next invoice by using the "Copy" feature like this.
Mobile Android and iOS
1. Open the Invoice Home app.
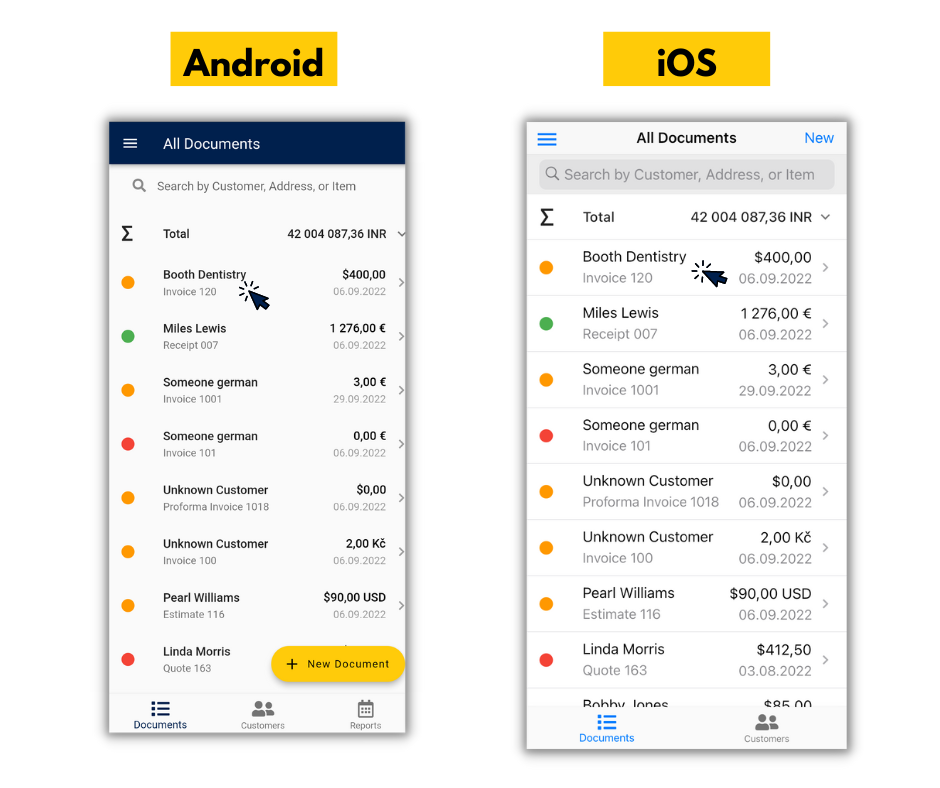
2. Click on an existing invoice or create a new one.
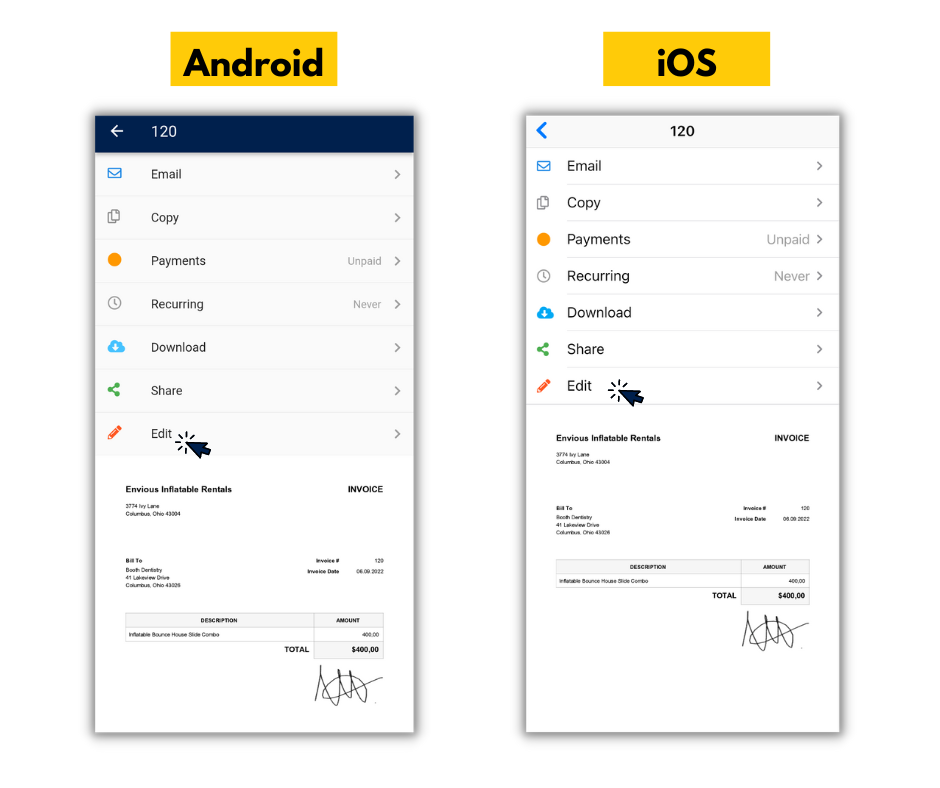
3. Tap "Edit."
4. Swipe the “Advanced Form” slider to the right to switch your document to the Advanced Form
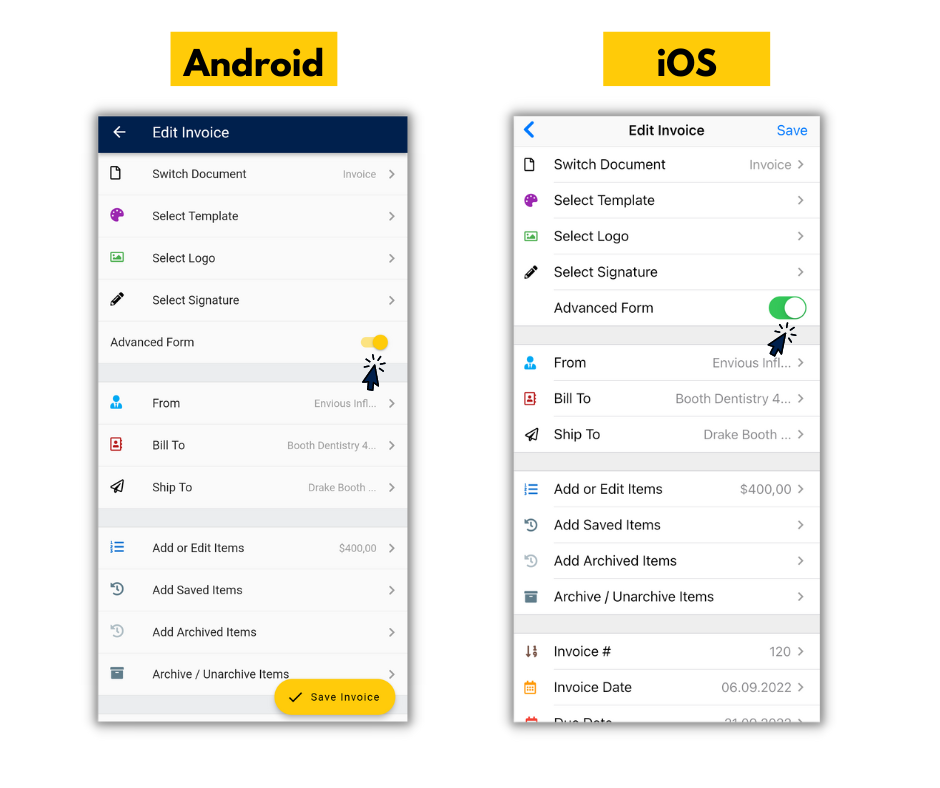
5. Fill in the information you would like to see on the invoice
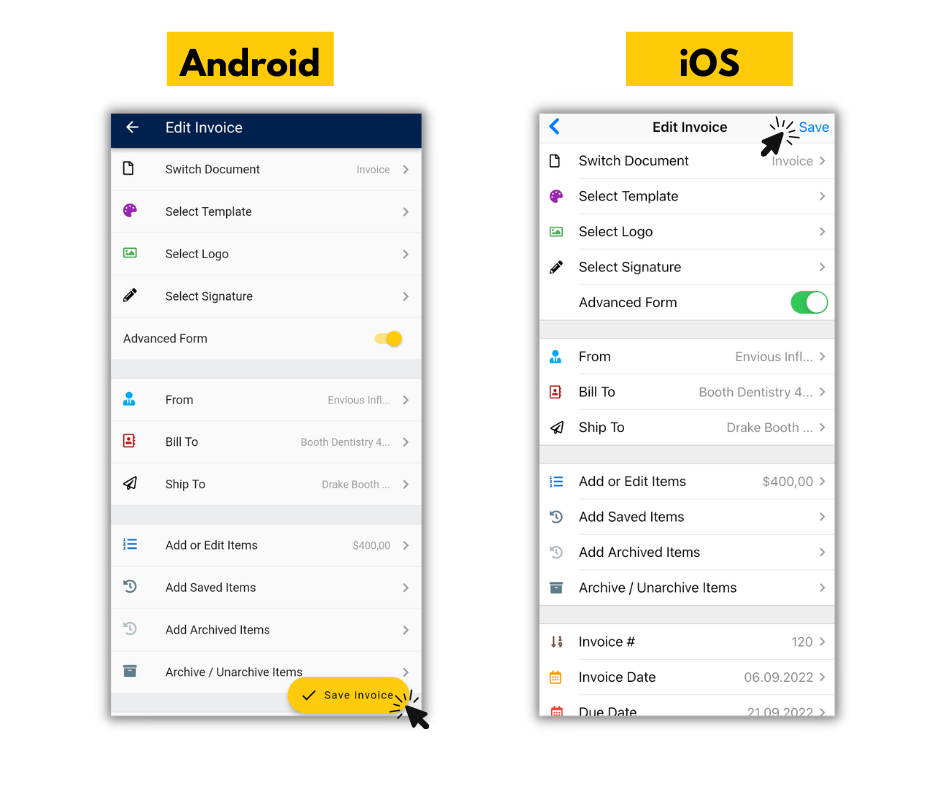
6. Tap "Save" on iOS or "Save Invoice" on Android.
That's it! You know how to and why to use our advanced form when creating a billing template. Click here to start editing your own invoice using the advanced form.
Pro tip: After you have entered all of your invoice details, you can save time on your next invoice by using the "Copy" feature like this.
Thank you for using Invoice Home!
Blog Posts
- Holiday Survival Guide for Small Business Owners
- How to Create a Budget for Your Small Business
- Time to Hit The Books, Best Practices for Bookkeeping / Accounting
- Invoice Home Expands to New Office In Downtown Austin
- Back-to-Business: Invoicing for your Small Business
- REPORT: U.S. Consumers Will Go Into Credit Card Debt, Use Buy Now Pay Later to Afford Holiday This Year
- Freelance is the Future of Work: How Invoicing Tech Supports the Shift
- Invoice Templates: Which is the Right One For Your Business?
- 5 Invoicing Habits That Will Help Your Business Stay Organized
- Tips for Small Business Social Media Success!
- Spread the Love (and Wealth) This Valentine's Day with Invoice Home!
- REPORT: Less Than Half of Americans Surveyed Are Confident in Their Ability to File Their Taxes Correctly
- HOW TO: Manage Multiple Businesses with Invoice Home
- REPORT: Delayed Holidays? 1 in 10 Americans Are Planning to Celebrate in 2025 Due to Cost
- REPORT: 2 in 5 U.S. SMB Owners Experienced Feelings of Depression in the Last Year
- What Is An Invoice? The 4 Most Important Elements.
- HOW TO: A Guide to Invoice Home - Features & Functions
- HOW TO: Create Your First Invoice with Invoice Home
- HOW TO: Recurring Invoices - pt. 1 - Steps to Set-up
- HOW TO: Recurring Invoices - pt. 2 - Seeing Sent Invoices
- HOW TO: Recurring Invoices - pt. 3 - Editing and Making Changes
- HOW TO: Recurring Invoices - pt. 4 - Stopping
- HOW TO: Get Paid in a Flash With Payment Links!
- HOW TO: Add More Details to an Invoice by Using the Advanced Form
- HOW TO: Apply a Discount to an Invoice
- HOW TO: Archive Items with Invoice Home
- HOW TO: Send an Invoice
- HOW TO: Use "My Customers" as an Address Book
- HOW TO: Create a Partial Payment
- HOW TO: Create and Download Cash Receipts
- HOW TO: Convert your Estimate into an Invoice
- HOW TO: Use 'My Reports' as Statements
- HOW TO: Add Two Taxes or a Compounded Tax to an Invoice
- HOW TO: Copy Invoice Items Quickly!
- HOW TO: Add Taxable and Non-Taxable Items on One Invoice
- HOW TO: Self-Organized Invoicing is Here!
- HOW TO: Manually Mark Invoices as Paid
- HOW TO: Invoice Customers Faster With the Email Feature!
- HOW TO: Customize Your Invoice
- HOW TO: Copy an Invoice to Create a New One
- 300 Stunning Invoice Templates for a Polished, Professional Look!
- 3 Tips For Enjoying Summer, Even When You Have to Work!
- 7 Ways to Prevent Work-From-Home Burnout
- How to Get a Customer to Pay Your Invoice
- New Year’s Resolutions for Small Business Owners
- Holiday Gifts for Small Business Owners
- Why You Should Use an Invoice Template Software
- Managing & Engaging Your Remote Employees
- How to Deal With Difficult Customers
- 4 Simple Steps to Start Freelancing
- How Your Business Can Profit From Halloween
- You’re Setting the Wrong Goals for Your Business
- How to Get Over Your Phone Anxiety
- Questions to Ask Yourself When Starting a Business
- 4 Steps to Take When Taking on a New Client
- How to Make Your Small Business More Professional
- 9 Invoicing Documents, and When You Should Use Them
- Common Mistakes Freelancers Make
- How to Network Without Leaving Your Home
- 6 Signs That You Might be Ready for a Side Hustle
- 8 Financial Blogs Small Business Owners Need to Read
- How to Prevent Late Payments on Invoices
- Top 10 Countries by Startup Ecosystem
- 5 Reasons To Use Paperless Invoices
- How to Avoid a Toxic Workplace
- Why You Should Upgrade to Unlimited Invoicing
- Tech and Economy: How Tel Aviv became the Start-up City
- The Importance of Customer Service
- 5 Plants to Minimize Toxins & Maximize Productivity
- M-Commerce in Developing Countries
- 9 Ways to Vacation Stress-Free
- How to Get Your Laptop Spring-Ready
- The Truth About Failure
- 5 Women You Should Know About
- The Most Expensive Super Bowl Ads of All Time
- Top 10 Cities for Female Entrepreneurs
- Jobs That Didn't Exist 20 Years Ago
- Gifts for the Entrepreneur in Your Life
- How to Secure Your Small Business
- Unique Ways to Thank Your Customers
- Best Cities to Live in With a Salary of $50,000
- How to Separate Yourself from Your Business
- How to Manage Your Mental Health as a Business Owner
- Books to Read Before Starting a Business
- 5 Ways to Get Loyal Customers
- Why You Should Take a Staycation
- Businesses You Can Start While Working Full Time
- Should Freelancers Ever Work for Free?
- How to Stay Active at the Office
- Best Business Ideas for People Who Love to Travel
- How to Perfect Your Elevator Pitch
- The Best Places in the World to Work Online From
- 5 Businesses You Can Start for Free
- How to Organize Your Desk for Maximum Productivity
- How Your Business Can Profit off the World Cup
- What the Color of Your Logo Says About Your Business
- How to Become a Wedding Planner
- Why Veterans Make Perfect Entrepreneurs
- Why Every Day Should Be "Take Your Dog to Work Day"
- 3 tips For First-Time Freelancers
- 3 Tips for a Stress-Free Vacation
- Spring Cleaning in The Office
- 5 Tips When Starting Your Business
- New to Invoicing
- 3 Tips on Last Minute Tax Filing
- Characteristics of a Successful Business Owner
- Accomplishing Your 2018 Goals
- How to Set and Achieve Your New Year's Goals
- Tips For Boosting Your Productivity
- Motivational Quotes to Get You Through Any Day
- New Flags on The Template Gallery!
- Be Featured on Our Site!
- A Helping Hand on the Road to Success
- How Wine and Invoicing Go Together
- 1st Day of Summer
- A Faster Way to Organize and View Your Documents
- 3 Ways to Wrap Up Your Month
- 5 Activities You Have Time for While Using Invoice Home
- What Invoices and Technology have in Common
- Get an Invoice that Suits You
- Stay organized! Bookmark customers, unpaid.. Here’s how!
- 500 Free Business Logos for You!
- Don't mess with passwords anymore!
- See why the New Invoice Home got a 5 Star Rating!
- 100 Professional Invoice Templates to promote your Brand

